Why It's Important to Optimize Your Images
When programming a web page, it's important to use the correct format for the job.
When appropriate, simply changing your images from png's to jpg's and using appropriate compression tools can bring down the site of your page significantly leading to faster load times, more pleasant user experiences, and better conversion rates as a result.
This is also the first thing any experienced web developer should tackle since, quite frankly, it's the easiest and least time consuming compared to other optimizations.
What it Looks Like in Practice
I was reviewing the work of a new staff member and the page was loading slow. Using Chrome Brower's DevTool, I switched over to the Network tab and reloaded the page.
The page came in on the high end in terms of "Resources" so I looked at each of the files to check their sizes. I found a couple of large png files (around 1.6mbs - 2.2mbs each).
I took a look at where these files were being displayed on the page and noticed two things:
- The images were being used as background images (approximately 1920 x 1080 each)
- The images did not contain any need for transparency
These two things are worth noting when deciding what format to choose.
Understanding Format Choice
When choosing which format is most appropriate to meet your needs, it's important to understand the fundamental differences between the most common image formats available to us as web developers.
Each one has its pros and cons and understanding the strengths and weaknesses of each one is important for optimizing your website for the best user experience (and improve SEO).
WebP ... I'm Not a Fan
The most common formats (in no particular order):
| Compression | Lossy | Animations | Transparencies | Vector | Mode | Support | |
| JPG / JPEG | High | Yes | No | No | No | RGB / Index | Full |
| GIF | Low | No | Yes | Yes | No | Index | Full |
| PNG | Moderate | No | No | Yes | No | RGB / Index | Full |
| SVG | High | No | No | Yes | Yes | RGB | Full |
| WEBP | High | Both | Yes | Yes | No | RGB / Index | Limited |
What the Heck is "Lossy"?
In the chart above, you probably noticed that PNGs are generally larger in file size than JPGs ("moderate compression" vs "high compression"). This compression rate is related (in part) because JPG compressions are "lossy" while PNG compression is "lossless".
This means that PNG files will go out of their way not to lose any details, but this results in a larger file size. JPGs use algorithms to determine which details can be sacrified or grouped together to ensure a smaller file size.
This doesn't apply to SVGs because, while the format is "lossless", it is not designed to contain photographs or pictures. Instead, SVG is the file format of choice for simple shapes (like logos and icons). Since SVGs contain the specific mathematical calculations to draw and fill the shape desired, it is considered a vector image.
This is handy because the mathematical instructions are extremely small compared to the same image as a PNG or a JPG. The limitation here is that the SVG must be created as a vector image from the start and doesn't contain any complex elements (like in a photograph).
TL;DR: Lossy sacrifices small details to achieve higher compression, lossless ensures that all details are preserved.
Getting Back to Our Example
So now that we have a slightly better understanding of the differences between the file formats, let's go back to the situation at hand.
In our case, the background images were no simple shapes or a logo. We do not need any kind of transparency. And the images are fairly large in dimension so we want to reduce the file size as much as possible.
My programmer had used a PNG file since they were concerned about losing detail. This is a fair concern but ultimately unwarranted since we're not going to use a huge amount of detail by converting the file to a JPG.
We're also not taking advantage of any of the other properties of PNG so we're slowing down the entire page for very little gain.
JPG it is.
The Good Stuff: Diving Deeper into JPG
So within the format itself are additional options. In fact, each of these formats has MANY additional options but I won't be getting into that here.
Selecting the right settings depends heavily on understanding the use-case.
For web, we don't need a crazy high DPI (dots per inch). We are also using these images as background images so having a nice large width makes sense (1920 in this case).
In PhotoShop, you can set these options easily under "Image Size". I usually change the DPI first since the program has a tendency to change your file width when you play with DPI.
It's also important to make sure the file is saved as RGB. Many photographers give us images in CMYK since this is useful for photography and printing. For web, RGB is better supported for JPG files.
Finally, when you "Save as", make sure to select the .jpg file extension. You will be prompted for a "Quality" score from 1-12 (depending on your version of PhotoShop). I usually select "High" instead of "Maximum" to gain a little more savings on the file size.
Once the file is saved, I do one additional step where I run the image through tinypng.com for even more file size savings.
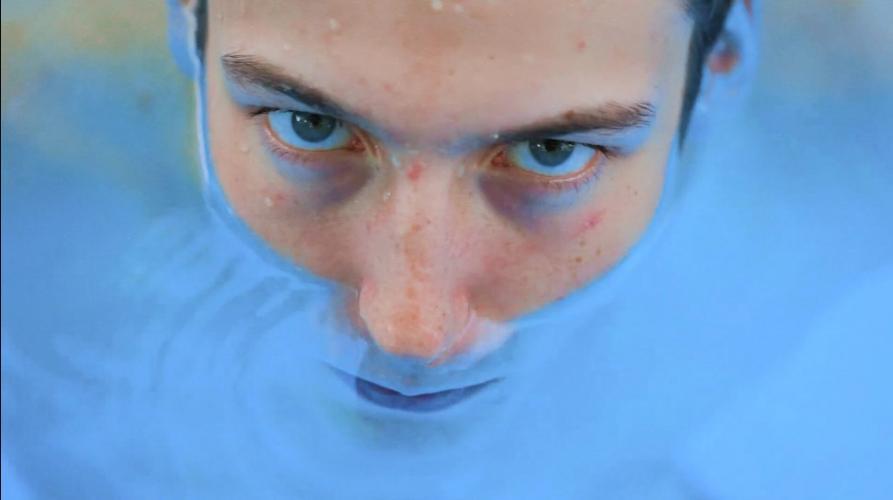
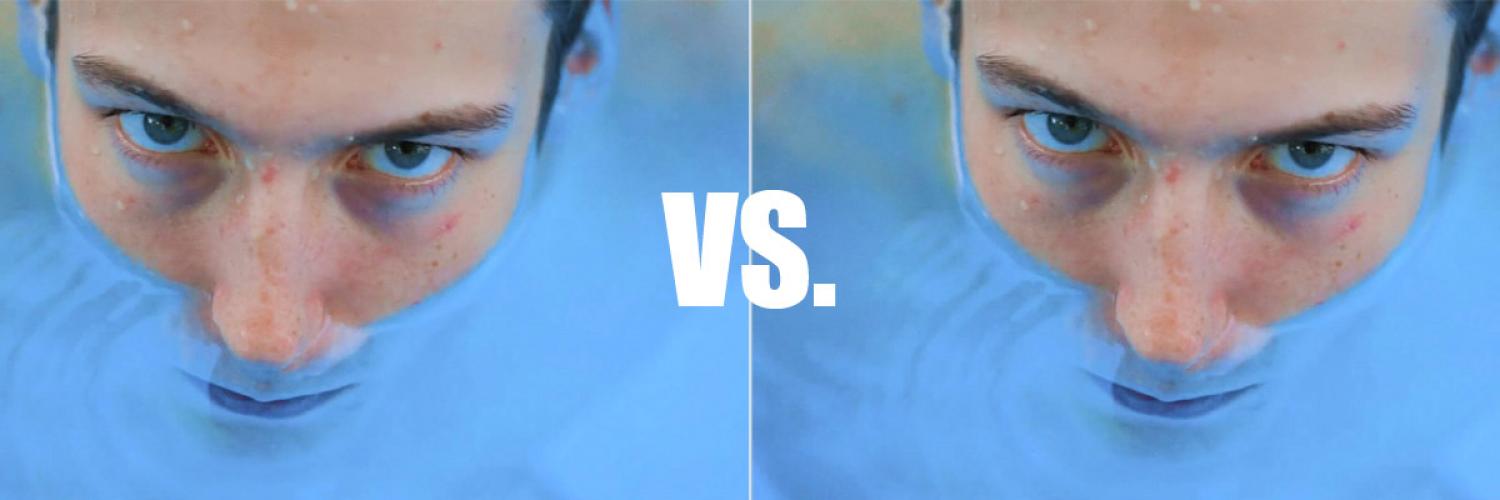
The Result
To the above is the final result of one of the images. I was able to follow the steps above and bring down the file size considerably.
I went from a 1.6mb PNG file to a sub 200kb JPG file with very little difference, visually.
Saving almost 1mb and a half doesn't seem like a huge deal but think about this on a mobile device. Think of this savings across a dozen images on a page. Think of this difference across hundreds of images across a site.
Knowing how to compress your files is one of the most basic things any good web developer should know how to do. These formats are well documented, well tested, and the information is only semi-technical.
The results are easy to see and the files are tangible making the more abstract ideas easy to grasp.
... I'll go on a rant about WebP in another post.
